I've learned a lot about carving faces over the last couple of weeks. I had decided that I wanted to carve a female face. I happen to like women. A lot! So a female face was a natural subject for me. It only took me almost six decades to actually do it!
But just doing something I'd never done before wasn't enough for me. No, not only did I decide to go to the distaff side of subjects, I also decided I wanted to do her as a woodspirit. In found wood! Not even that was enough. I did her in seasoned found wood. Am I a glutton for punishment or what?
Of course I wanted to do a good job. I wanted to at least make her attractive, if not beautiful. Think
dryad. So I had to do some studying. My first stop was Ian Norbury's book,
Carving Classic Female Faces in Wood. Of course Norbury is a good carver (yeah, let's understate the thing just a bit), but his women are fantastic. So I spent a goodly amount of time poring over his step-by-step photos, learning what he did when. (The time I spent droo . . . um . . . studying the blown up photos of his model was purely research. Yep!) I must admit, though, that his slavish attention to perfect symmetry got on my nerves a bit.Speaking of symmetry, or the lack thereof, my next stop was a Marv Kaisersatt study cast of a young woman. I made the mind-boggling discovery that Marv is no more wedded to bilateral symmetry than I am. I must make a small diversion here to explain how I went about studying the Kaisersatt cast.
One of the blogs I follow is Doug Stowe's
"Wisdom of the Hands", an excellent blog about the role of the hands in education. One of his posts (I wish I could find it again) made the point that modern Man has effectively lost the ability to "see with the fingers". As a woodcarver/sculptor I took that to heart and decided to take the Kaisersatt cast into a dark room and study it with my fingers. It took me a while to get into the groove, but eventually what a revelation! I
saw something with my fingers that I had never seen before while examining the cast visually. The left side of her face was
off! I speculate that while messing with the hair, he carved off a little (actually more than a little) too much off the temple. Instead of coming down and merging more or less smoothly with the cheek bone as on the right side of her face, he left a shelf of cheekbone running back under her hair toward her ear. A not inconsiderable shelf even though I never noticed it until I took her into a dark room and ran my fingers over her face. (yeah, yeah, take your best shot!) Not only did he make that "mistake", he allowed it to be immortalized in a study cast! How's THAT for confidence!
Okay, okay, moving right along. The next place I went was Lynn Doughty's blog,
Out West Wood Carving. Lynn, like Marv, is arguably one of the finest caricature carvers alive today. He's always been generous with his advice and has an extensive gallery of WIP photos of his pieces. Just recently he's begun posting tutorial videos, and during the last week or so has posted a series of videos showing how he carves a head and face. Absolutely first rate work! He does have a tendency to get between the camera and his carving, but his wife, who is both cameraman and director, doesn't let that last long. If you have ANY interest in carving faces, whether caricature or realistic, you MUST view that series.
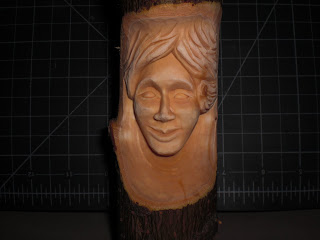
So that's what I studied. And I got a lot out of all the sources. You've seen my starting point above. You'll notice that the face is very long and the brow comes out just as far as the tip of the nose. One of the things I picked up from the Kaisersatt cast and was echoed in the Norbury and Doughty materials was that the brow is typically farther in than the tip of the nose. This next photo shows that corrected.
This is a front view at the same stage of carving. The chin is still longer than I like, and the sketched-in eye is too high.
I was able to correct that, mostly. The rest of the photos are of the almost finished piece. The only think I lack is putting in the pupils.
She's pretty good, but I'm going to do better.
Until next time, let the chips fly!


