Wednesday, March 25, 2009

Evolution of a Lovespoon Design

OK, take a deep breath. We are about to delve, very briefly and shallowly, into the history and symbology of lovespoons. I am by no means an expert on this, so take what I say with a grain of salt. Or two. If you want to delve more deeply into the history of lovespoons you should go here. The most helpful and informative books I've found are David Western's Fine Art of Carving Lovespoons, and Shirley Adler's Carving Spoons. Do a Google search on lovespoons, and you'll find even more sources. Just be aware that not everything you read on the interwebs is totally reliable! 
Let's start off with the design of my next lovespoon. The first picture shows a scan of a pencil sketch I did in my notebook. I started with a central idea: a loving couple with hearth and home. That became the overlapping hearts in a house-like structure. I thought next I would have a symbol of protection: the Celtic dragon below the house. You will note that the firey breath and the end of the tail are also hearts. Now for a symbol for luck. Why not a four-leaf clover. Better yet, the leaves look like hearts. Then the bowl of the spoon: another heart. Getting the drift here? You'll notice if you look closely I first thought of a pair of diamonds just above the bowl. Diamonds represent prosperity for the loving couple. But I didn't like the transition to the bowl, so I tried the clover.

Unfortunately, I didn't like the way the clover and the heart-shaped bowl looked together either. There wasn't any way I could see the clover flowing naturally and smoothly into the bowl. So I refined the clover design a bit and had the stem flow into an oval bowl. I think that looks much better.

But I needed another element on top. I try to make most of my lovespoons about 11" to 12" long and maximum 3" wide. That proportion appeals to my eye. Your mileage may vary. Based on those measurements I find that each element should be about 2-1/2" tall. So I needed to add something to the top. I found a Celtic eagle that I liked. It could symbolize both protection and the national symbol of the United States. 

Now I got to thinking that having the dragon and the eagle was a little too much emphasis on protection, so I had to go looking for something else. I found a rounded Celtic design of kissing cranes and decided to go with that, symbolizing togetherness for life. The second picture is of the finished design drafted out and ready to transfer to the wood blank. The shaded areas will be pierced through, and the heart-leaves of the clover will be carved with a central vein and relieved edges so that they look like clover leaves. The tail of the eagle will go behind the peak of the house's roof.

I've learned that the symbology can be somewhat flexible as I hope I have illustrated here. Other elements you can add would be things that illustrate a common interest in the happy couple. If they love to sail, you might have a boat somewhere in the design. In general, though, other common symbols are lock-and-key for security, anchor for stability, bells for marriage, entwined vines or Celtic knots for growing together, endless Celtic knot for endless love, horseshoes for good luck, balls in cage for children or captured love, cross for sanctity in marriage, and so on.

So that was my thought process in putting together this design. David's book has an excellent chapter on design that taught me a lot. Maybe not enough, but I like this design and can adjust it as I carve, making elements bigger, smaller, fatter, thinner if I think it improves the overall look. The idea is to have a balanced design such that the eye flows naturally to the central idea and that the design flows from one element to another without jarring changes. I think I've accomplished that here, but let me know what you think.

Until next time, let the chips fly!


Saturday, March 21, 2009

Introducing, The World's First . . . .


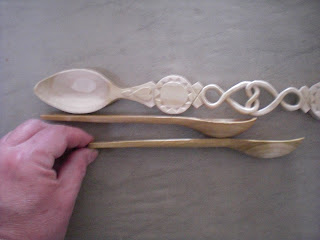
Introducing the first Lovespoon/Companion Spoon set in the world. As far as I know. I asked the most knowledgeable person I know about it, and he had never heard of such a thing. I've also not seen anything about it in the research I've done, so, until someone can prove me wrong I'm going to lay claim to it!

The Companion Spoons are a matched (more or less) pair of eating spoons to accompany the primary lovespoon. They will be available with the names of each of the loving pair carved or kolrosed into the handle. I'm also thinking about producing some manner of spoon rack in which to house the Companion Spoons. I haven't decided precisely what form that will take yet. 

One thing that is blatantly obvious is that the color of the wood for the Companion Spoons don't match the lovespoon. Well, it did before I finished them! The eating spoons and the display spoon require (??) different finishes. The lovespoon was finished with an application of hot neutral shoe polish. This leaves the wood of the spoon very near the original color of the unfinished wood as very little of the shoe polish is absorbed by the grain. Obviously I can't finish the eating spoons with shoe polish. It may not be toxic, but it certainly will contribute a distinctive whang to the taste of anything eaten with the spoon. 

I finished the eating spoons by soaking them in food-grade mineral oil. I've been using an eating spoon finished with mineral oil for about a month now, and I'm liking the way it holds up so far. Could I finish the lovespoon with mineral oil? I could. But just because I could, does that mean I should. What do my Gentle Readers (yes, both of you!) think? Oh, ye who are more knowledgeable about wood finishing than I (just about everybody) think about that idea? Leave me a comment about what you think. 

Next time I'll go over the evolution of a lovespoon design. Until then, let the chips fly!

Sunday, March 15, 2009

AARRRGH! . . . . . Oh, wait


Since last we talked about this lovespoon, I finished the piercings, hollowed the bowl, and began the other decorations. As you might remember, those decorations in the flat spots beneath and above the roundels were intended to be kolrosed.

Well, I did it.

The result was HORRIBLE! Much to my embarrassment I have posted that photo. I refuse to post the close ups! You can get close enough by just clicking on the photo. The cuts aren't straight. They overrun the borders. Too close together so pieces of wood chipped out. Disgusting! Must. Practice. More.

Well, I couldn't let THAT stand! I racked my brain trying to figure out how I could salvage this spoon. I finally decided that the best way, the ONLY way, was to relieve the wood in the kolrosed areas down to a point below the penetration of the kolrosing knife. Not as difficult or disruptive as I thought it would be. Once I was there I had to determine what to put in the blank spots. And boy, were they BLANK!


As you can see, I decided, after much deliberation, to go with diamonds in the small spaces and raised hearts above the bowl. The diamonds were a cinch, and the hearts weren't difficult at all.


After having thought about it a bit I believe that this turned out better than it would have if the kolrosing had been right on. There's nothing to distract from the wood, which the kolrosing would have done. Of course the diamonds could have been a bit more even had I planned them from the beginning, but, not bad. Not bad at all.

I was talking to someone a while ago about "adjusting" the pattern as you carved. He was of the opinion that in something as "precise" as a lovespoon the pattern couldn't be adjusted during carving. It would ruin the meaning of the knots and symbols. To that, I say, "PAH!"

What do you think about my adjustments and in-progress adjustments in general?

Next time I'll finish up the companion spoons.

Thursday, March 12, 2009

It's a Spoon!!!


I want to thank profusely the people who responded to my call for help! Among them, in no particular order, The Great Ethan Allen, Sir Richard, Carl, Tom H, Dell Stubbs and David. Each of them contributed in one way or another to shaking the scales from my eyes that I might SEE!! The result is pictured below: the same spoon as in the previous post, but modified. It still needs a little refinement, but at least now I know where I'm going.  Thanks, guys.

Tuesday, March 10, 2009

Help!


OK, what you see here is a lovespoon companion. Don't ask your neighbor what that is, because I think I just invented it. At least until I can ask David Western if he's ever heard of such a thing.

According to me, a lovespoon companion is one of a pair of eating spoons carved from the same wood as a lovespoon and with the same basic bowl style. The names of the lucky owners will be kolrossed into the flat of the handle.

And the handle is the issue before us today. This handle is, to my eye, rather clunky.

I've about got the bowl where I want it, though I'm still not totally satisfied, but I'm really not pleased with the handle. I don't like the transition from bowl to handle either from the top or the side. The top view, I think, can be "handled" (har, har) by making the transition thinner. I don't know what to do with the side view. You have to leave more wood there to keep the bowl and the handle from parting company, but I don't really like the way it looks. Also I think I need to introduce some curveyness (that's probably not a legitimate word) to the profile  toward the end.


So what I'm asking my Gentle Readers (yes, BOTH of you) is to give me some suggestions (constructive, please; if I want abuse I can go back to work) about how to improve the handles of my eating spoons.

And what are the prizes, Johnny?

Nothing, nada, zip. Just the satisfaction of having helped an addled wood carver in need of a kick in the creative behind.

I'm looking forward to seeing your suggestions, so don't hold back.

Next time, back to the lovespoons. Until then, let the chips fly!

Saturday, March 7, 2009

New (Less Complicated) Lovespoon - Part 1


I know, I know. Last week I said I was going to give lovespoons a rest and do some work on my Santas. But then I got an idea for a new lovespoon. Once I sketched it out, I had to start work on it. Way too often my enthusiasm overwhelms my patience. Any how, I drew the pattern full size and traced it onto a nominal 12"x2"x1" poplar board using graphite transfer paper.

Since, other than a hand drill, I don't use noisy power tools like band saws and scroll saws, I have to have work-arounds. Cutting through 24" of wood with a coping saw is a daunting task even with the super-aggressive blade I have in it. So I took my Japanese hand saw and cut from the edge of the board to the edge of the pattern. THEN I used my coping saw to cut off the resulting tabs. Watching those tabs fall to the floor really made me feel I was zipping along. Whether I was or not.

Once I had all the tabs cut off, I drilled the holes in the portions of the design that will be pierced and broke out the Japanese saw again to rip half the thickness off the handle. Since the joint between the bowl of the spoon and it's handle is so thin in plan, I left plenty of thickness in the back to strengthen it.

I filled out the design in pencil. The roundels are to be spaces for initials and dates. They will have chip-carved borders. You can see I messed up the border design on the top roundel. Luckily all I have to do to fix it is erase and redraw. The cross hatched areas will be kolrossed and the space just above the bowl will have a chip-carved star.

At this point I have just over an hour invested in this piece, exclusive of the design time. And my shoulder is sore from all the sawing! That's OK. It's good, cardiovacular exercise, and, Lord knows, I need more of that.

So, enough for today. I'll have my next post up in a couple of days continuing with this spoon. I hope by then I'll have figured out how to post photos in a more logical manner, so the sequence isn't all screwed up as it was with this post.

Thanks for dropping in. Until next time, let the chips fly!