Showing posts with label carving. Show all posts
Saturday, November 5, 2011
Laying Out The Face
Here we go, people! Getting down to business! As I said earlier, start out with a birch wood dowel 1-1/2" in diameter and about 6" long. You can start with a branch if you want, but I recommend commercial wood to learn on because of its consistency.
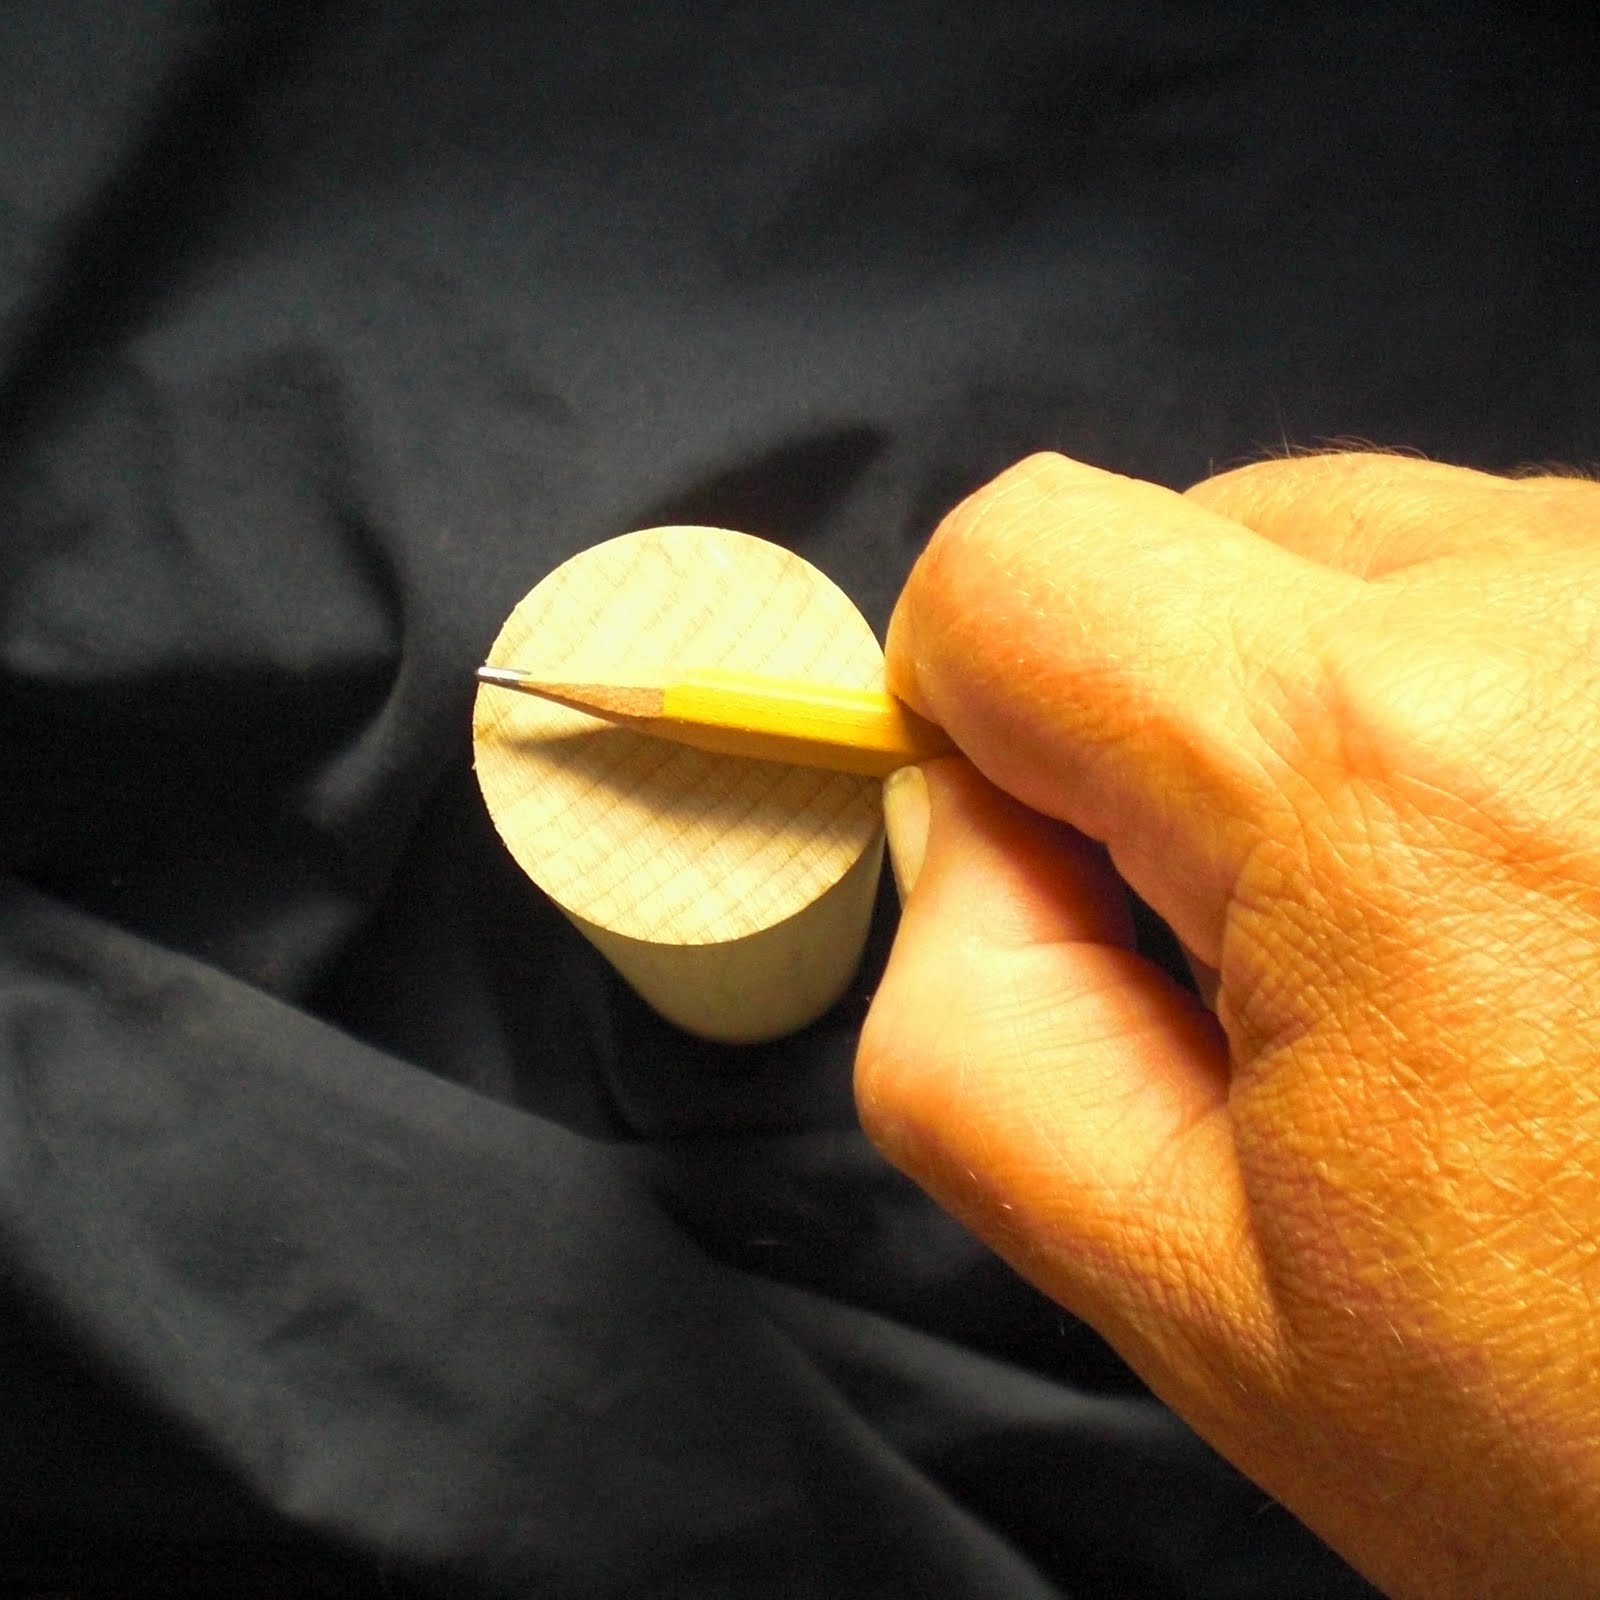
The first thing you want to do is draw a center line down the length of the dowel. It doesn't have to be exact. (You'll be hearing that OFTEN!). I put my pinky against the dowel and pulled my hand down the length with the point of the pencil against the wood. This will help you keep both sides of your carving more or less symmetrical. I say "more or less" because absolute symmetry is not only unnecessary, it is unnatural!
Now we are going to start laying out the face. You might notice that I haven't mentioned anything about a "pattern". That's because I think patterns for this type of carving are unnecessary and stifle creativity. If you learn to carve without a pattern, every carving will be different. And that's the way it should be! It's more fun to be surprised when the face emerges from the wood. Draw a short line across the center line roughly an 1-1/2" down from the top. This will be the location of your face's hair line. This will give you room on the bottom for a flowing beard. We are going to be doing a woodspirit with long hair and a flowing beard. I chose this for the very good reason that it will allow you to concentrate on the eyes, cheeks and nose (where most people have issues) without worrying about ears and chin.
Now let's talk about facial proportions. Absolute measurements are NOT important. Close is good enough. Remember the "Rule of Three". Take a look at The Woodbee Carver's site for a good diagram. Also check out his blog. It'll be well worth your time. In addition to what you see there, the width of the face (we are going to use the whole width of the dowel for that) is 2/3 of the distance from the hair line to the chin. So, using the precision caliper that is my hand and pencil I measure the diameter of the dowel.
I transfer that measurement to the front of the dowel by putting my thumb at the hair line mark, then lift my hand until the tip of the pencil contacts the wood, where I make a small mark. I extend that mark a bit so that it is more visible. This gives us the location of the bottom of the nose.
Since the distance from the hair line to the eye line is 1/3 the length of the face, all we have to do is divide the distance we just marked off in two by placing a line ABOUT half way between the two lines we've already drawn. Now we have the location of the eye line.
The distance from the nose line to the chin line is equivalent to the distance from the eye line to the nose line. So, using that precision set of calipers you have on the end of your arm, measure that distance, move your thumb to the nose line, and make a mark on the center line. This gives you the location of the chin. You may ask that if we are going to cover the lower part of the face with a beard, why do we need to know where the chin is. Even though the chin will be covered it will still affect the shape of the beard, so we need to know where it is.
You should now have something that looks like this. You have now located all the major features of the face we are going to carve.
Now I suggest that you take the hair line and extend it in a more or less natural curve out to the sides of the dowel and down to below the nose line. This is the starting point for all the hair that will be on this guy. You should extend the facial lines out past the hair line, because you will be carving these marks away as you work. You'll want to redraw those line several times, so it helps to have them where they won't be carved away.
We'll stop at this point for now. Next time we'll actually put knife to wood!
So, until then, let those chips fly!
Labels:
carving,
carving faces,
facial layout,
rule of three
Monday, October 10, 2011
THE MAGIC OF FACES - KNIVES
As I believe I mentioned earlier these posts are going to be enhanced and made into a book that will be available on Kindle and Nook (assuming I can work out photography) for the low, low price of $2.99. For that reason I'm covering the initial steps prior to carving just like it was a tutorial for a beginner, hence the posts on knives and the one to come on Safety. Be patient, we'll get to the actual carving very soon.
The knife you use to carve is important. It has to fit your hand, not slide around when your hand gets sweaty, and be comfortable to hold for long periods. More important than the knife is how sharp it is. For most of my carving life I used a folding pocket knife (more on this later), and while it was what I considered sharp, I didn't really know what sharp was until I purchased my first fixed-blade, honest-to-goodness carving knife from Del Stubbs at Pinewood Forge. That's the knife I'm talking about there to the left of old Happy, the Wood Spirit. I have since learned to put a carving edge on just about any knife, and I would suggest you do the same. You don't need a lot of expensive equipment (multiple diamond hones, water stones, ceramic stones, etc.) to do the job right. Just google "scary sharp system" and you will find everything you need for not much money. Just don't fall into the trap of over-sharpening. Once you get a good edge on the knife (many knives come with a great edge) all you need to do is strop the edge every half hour or so. Unless you try to carve a nail or something you should almost never touch the knife to a sharpener again.
Another knife I have used is the Flexcut Pelican pictured here.
I consider a sheath of some kind an essential accessory to a carving knife. They take up less room (yeah, even that Flexcut sheath) than the traditional packaging a knife comes in, and they provide protection for the edge. This Flexcut sheath is pretty pricey, about half the cost of the knife itself, but it will save you a lot of worry.
Del Stubs's knives come with traditional Scandinavian birch bark sheaths at no extra cost, so the cost of one of his knives is about the same as the cost of a Pelican and sheath.
I've posted an official photo of the Flexcut Pelican to point out a peculiarity of mine. I can't leave a production knife alone. I've always got to be modifying them to make them fit me better. By comparing the photos of my Pelican above and the factory Pelican here, you can see what I've done.
The first thing I did was take a sander to the handle and remove the factory finish. Straight from the factory Flexcut knives come with a hard, slick (polyurethane, I presume) finish to the handle. As soon as my hand starts sweating, the knife starts trying to slide around. This results in gripping the knife harder and, for me at least, a case of tendinitis (we'll talk about this in the upcoming Safety post).
The next thing I did was very carefully grind the hump off the point of the blade. Flexcut puts that hump there to strengthen the point, but I wanted a point that would allow me to make really tight turns. I knew grinding that hump off would make the point more delicate, but I've broken enough points off blades to know how to avoid that.
This lesson of this is that you can take a factory knife that isn't exactly what you need, and, with some research and experience, modify it to make it truly yours.
Now, this is the one knife that I'm going to use to carve the face in this tutorial. It's the Regular Slojd from Pinewood Forge. It has a 2-1/4" blade, a birch bark sheath, a beautiful wood handle that doesn't slide around in your hand, and costs $38 the last I looked. If you like a shorter blade they have the Short Slojd with a 1-3/4" blade. (Full disclosure, I have always paid for everything I received from Pinewood Forge.) Del and Mary are great people to deal with and will bend over backward to get you what you want. By the way, I haven't modified this knife a whit. It's perfect the way it is.
You may have noticed something about all the knives I've recommended here: they all have a curved edge. I think this is the best blade style for a beginner. I prefer the curved edge because it makes slicing cuts easier. A slicing cut is the easiest, most efficient way to cut wood. It requires less force and thus is safer. Even when you push the blade straight into the wood, the curved edge imparts a natural slicing action. An awful lot of carving knives have a straight edge, some variation of what is called a Wharncliffe blade style. I do use these blades for some things, but I consider them an expert's blade due to the more complex motion that is required to get a slicing cut.
One more caveat, you will need a knife with a relatively thick blade which gives more support to the edge. That's not so important if you are carving in commercially obtained wood, but if you are carving in found wood, and you will probably want to do that sooner or later, you will want that support to deal with whatever foreign objects (dirt, etc.) might be present. Just be careful.
About folding knives: beginners shouldn't use them. Now some may call me an uneducated hypocrite because most kids start whittling with folding knives, and, in fact, my first whittling knife was a folding knife. But today I wouldn't start any child or adult beginner with anything but a fixed blade knife for safety reasons. Until you get good with a knife, practicing the proper ways to make a cut, folding knives have a tendency to fold (go figure!) and cut your fingers. Yep, happened to me on a couple of occasions. So, please, stick to fixed blade knives for a while.
If you have any questions about knives, sharpening or stropping, feel free to leave a comment.
Next time we'll cover Safety. You'll want to pay attention because, trust me, blood will just ruin a good piece of wood.
Until then, let the chips fly!
Labels:
carving,
carving faces,
knife,
knives,
pocket knife,
wood carving
Monday, October 3, 2011
THE MAGIC OF FACES
Faces are an endless source of fascination for me and for many other carvers. One of the most often heard requests is "Can you teach me to carve faces?" And that's only natural.
Human beings are hardwired to recognize faces. I believe that to be a survival skill from our earliest tribal days a million years ago. At that time our pre-homo sapiens sapiens ancestors lived in small groups that could be called tribes. Inter-tribal warfare was probably more common than not, so it was a decided advantage to be able to distinguish between "us" and "them". "Them" were dangerous!
Facial recognition was also a great help in keeping the nuclear family stable. Imagine the embarrassment if Ugh got caught dragging Eeep's wife off to his cave. "Ooops! Sorry Eeep! I thought she was my wife. You know these females. They all look alike to me."
Research has shown that humans can recognize a face in the most rudimentary of drawings or pictures. Take the Happy Face for example. What is it but a circle, two dots and a curve.
Not only do we see faces in rudimentary drawings, we also see them in nature: clouds, rocks and even pieces of wood. Take The Jester up at the top of the post. Before I took my knife to him, he was just a piece of a tree branch, but I could see him in there just waiting to get out.
It's a lot of fun to carve faces into found wood, but for beginners or moderately advanced carvers it is easier to learn with commercially processed wood. Found wood is, to be polite, variable in quality. The piece that I used to carve The Jester had soft spots, downright rotten spots, and grain that went every which way. It short, it was a challenge, one that required the use of CA glue to stabilize a couple of areas.
That's why, as I show you how I carve faces I'll be using a piece of 1-1/2" birch dowel that I got from my local Woodcraft store. You just buy a 3-foot length for less than $5.00 and cut it up into six 6" pieces. It's cheap, so if you accidentally turn it into firewood, you haven't lost much in the way of materials. The wood is consistent in density and the grain runs all in one direction. That's what I used to carve old Windy there.
In the next post I'll talk about the knife I use. I say knife instead of tools because I'm going to be showing you how to do this with one knife. Once you learn how to carve a face with only a knife, it's easy to bring other tools into the process.
So, until next time, let those chips fly!
Labels:
carving,
faces,
green wood,
instruction,
wood carving,
wood spirits
Sunday, October 25, 2009
It Ain't Fire Wood Redux
We got some snow this week. I took a couple of pictures through the windshield of my car on my way to work just before sun-up.
The quality isn't the best, but you try taking a picture one handed through the windshield of your car! That white peak to the right in the first picture is Pike's Peak at 14,192'. Or something. It is one of the Fourteener's here in Colorado. If you look closely you can see the line on the mountains where the snow starts. That's about 8,000 feet.
I also did some reworking on last post's subject. I'll post the photo of the original next to the photo of the revised work.
It's amazing how little wood was taken off to produce this effect. I thinned down the nose and changed the profile of the bridge and elevated the tip a bit. I removed some wood between her mouth and her nose. I also altered the lower lip and took some shavings off the bottom of the chin. All the chips I removed could be put in a thimble with lots of room left over. She's still not as feminine as I would like, but good enough until the next one.
Currently I'm working on a new Santa ornament, a small male wood spirit and a very small tasting spoon. I'm using slightly different techniques on all of them. It'll be interesting to see how they turn out.
Until the, let the chips fly!
Labels:
carving,
w,
wood,
wood carving,
wood spirits,
woodcarving,
woodwose
Sunday, August 16, 2009
Pocket Knife Mods & Minis
OK, between Arleen's pocket knives and Don Mertz' Tinker Knives I decided I had to modify some pocket knives for carving. Yeah, I'm a knife freak. Any excuse to have another knife to play with is good.
For a $15 knife this one is pretty good. Nice bone handle (or at least it looks like bone); fit and finish are a lot better than I would have expected for a knife of this price. While information on this knife is scant, I suspect that the steel is 420HC. In spite of the bad rap it has among the knife snobs, it's not a bad steel. It's capable of being hardened to a 57 on the Rockwell C scale (HRC57 or 57RC), which is about the minimum hardness you want in a carving knife. By the way, don't fall for the hoary old salesman's pitch that a knife holds an edge for a long time is also easy to resharpen. The knife that holds its edge a long time does so because the steel is hard. Hard steel is tough to resharpen. Period. End of story.
So I went looking for a nice, cheap 3-blade stockman to experiment on. I found it at Sportsman's Warehouse: a Chinese-made stockman under the Winchester brand.
In any case 420HC has the compromise of being hard enough to give decent service without being too dificult to resharpen. Now, when you think about it, about the only time you should sharpen a carving knife is when you do physical damage to the blade. Normally stropping the blade about every half-hour or so during use should be about all the sharpening you need to do. I have some knives I haven't taken a stone to in almost two years.
To make a long story short (too late!) I wasn't too worried about the steel. I was more worried about the springs: that they were strong enough to keep the blades from closing too easily. Keep in mind that 99% of 3-blade stockman knives have no locking blades. Now since I never saw a locking blade knife until I was out of college, I know how to use a slipjoint knife safely. Slipjoints may not be a good choice for a knife novice. Nah, strike that. I was 8 years old when I got my first knife, and it was a slipjoint. I never had the knife close on my fingers (came close a couple of times; the accellerated heartbeat reminded me not to do that again). Become acquainted with the knife, opening and closing it until your fingers hurt. Then take small cuts and never try to force the blade through the wood. You'll be fine.
The blades you see in the photo above are not how they came from the factory. I used Arleen's method of sharpening to regrind the blades. Like virtually every factory knife that wasn't made in Scandinavia, the blades had a secondary bevel. I used 5" sanding disks in an electric drill to grind the sides of the blades to as near a straight line as I could get from the back of the knife to the edge. I started with 220-grit wet-dry sandpaper to do the main grinding, holding the blade to the sandpaper for a couple of seconds, the dipping the blade in a cup of ice water to keep the steel from overheating, then grinding again. I did this until the secondary bevel was gone. Then I sanded each blade with 400-grit, then 800-grit to take the scratches out. I finished off by stropping. I made the strop from a 5" circle cut from the back of a pad of yellow paper, used spray adhesive to mount it to the sanding pad, and loaded it with green polishing compound. I was able to get a very high polish on all the blades.
Then I got out the Dremel. With a grinding stone. The single blade on the left was a rather exaggerated spey pattern. I have come to really like the big sweep/sharp point profile, so I modified the blade to that profile. Touch blade to stone, dip blade in ice water, and repeat. At 30,000 rpm even that method doesn't take long. The shorter blade on the right started out as a sheepsfoot pattern. I'm slowly working it into a Wharncliffe. I left the main clip blade the same profile, though at 2.5" it is longer than I like. Once I get the Wharncliffe profile where I want it, I'll probably work on shortening the clip blade.
One more thing before I tell you the results so far, if you choose to do this, expect to have the blade edge roll on you the first time you use it. That's because the steel isn't hard enough to support the scandi-type edge at such an acute angle. A couple of good stroppings will put enough of a micro bevel on it so that the edge won't roll.
So, how did it work? I used the ex-spey blade to do these two 3" tall Santas. In case you can't tell, one of them isn't finished. The knife worked like a champ! It's not a Ralph Long knife, but it's usable.
I gotta tell ya, carving these little guys scares the peewaddin outa me! (That was a phrase of my mother's, a genteel Southern lady by all accounts; if someone could tell me what "peewaddin" is (come on, Thomp, Tom, Gene), I'd greatly appreciate it.) Not because I'm afraid I'll get cut. Got over that a LONG time ago, but because taking off a 5-thousandths of an inch shaving (yes, I measured; I'm an engineer; get over it) in the wrong place could be enough to convert a nice little miniature into fire . . . . um, kindling. Maybe once I've done 1000 of them, like Tom, I'll get over bein' afeerd.
Until next time, let the chips fly!
Labels:
carving,
knife,
pocket knife,
Santa,
wood,
wood carving,
woodcarving
Sunday, May 31, 2009
New Way of Carving Faces
Last time I mentioned that while carving at Territory Days I tried a new way of carving faces that I like better. I almost always carve faces "on the corner", that is, with one corner of the block being the nose. I used to start with roughing out the nose, then move to rough out the eyes, then the mouth, THEN start to establish the width and depth of the head. I have now started to change the way I do things. I still begin with establishing the position of the nose and build the face around that. But now I establish the width and depth of the head before I begin on the eyes.
Those of you with sharp eyes will notice that this elf is being carved in Spanish cedar. "What?" you say. "Spanish cedar! Are you nuts? Don't you know that Spanish cedar DOES NOT HOLD DETAILS WELL?"
Well, yeah. I know that. But it was what was close to hand, and, since this was pretty much an experiment with new work methods, I figured that if I FUBAR'ed it I could blame the wood. And if I screwed it up just a little I could use the grain to hide the "design adjustment". So sue me!
Oh, by the way, this is my first elf. Talk about a glutton for punishment!
As it turned out, it wasn't all that bad. Sharp knives and tiny, tiny chips will allow you to carve in almost anything if you have the patience. Besides, I'm the kind of guy who is apt to say, "What the hell, let's try it and see what happens!" (See Kari Hultman's blog post on that kind of attitude and it's gender implications.)
I also changed the way I do eyes. I normally use a straight "v" cut to establish the eye channels and refine from there. Here I have used a method similar to what Tom Hines uses. I made a stop cut alongside the bridge of the nose with the blade at a slight angle away from the center of the face (to establish the side slope of the nose), moved the blade up until it was almost vertical as I reached the beginning of the eyebrow, and then slanted the knife blade towards the bottom of the face to establish the slope of the upper part of the eye socket. I then started the second cut with the blade at a pretty acute angle up toward the top of the face at the beginning of the previous stop cut. I continued the cut up and around the top of the cheek trying to meet the previous stop cut. When the chip pops out you have established the upper slope of the eye socket and the upper slope of the cheek. Then (particularly if you are working with cedar) you take tiny, tiny chips out of the upper slope of the cheek, increasing that and defining the lower curve of the eye mound. You can see that in the four photos above. I hope. (Click on a photo to get a full size version.)
The point of all this change is that by rounding the face before hand and doing the eyes this way, I seem to be able to be more consistent in forming the eye mounds leaving me more leeway in how I choose to finish the eyes, whether open, winking, or happy squint as I have here.
(BTW, that wispy thing clinging to the elf's hat is NOT a cat hair. No. Absolutely not. It is, in fact, an artifact on the film . . . uh . . . digital imager. Yeah. That's it! An artifact. That's my story and I'm sticking to it.)
Which brings me back to Spanish cedar. You can carve it. I made several boo-boos that cost me a chunk of the nose and another chunk of the beard (such as it is). I was able to save the piece with two strategies: Start off making things a little bigger than they need to be; cut tiny, tiny chips with a very sharp knife while you are doing details. Because, EVERYONE knows that cedar DOES NOT HOLD DETAILS WELL!. Well, almost everyone.
Speaking of eyes, I do several different types. Probably not good for my "brand", but it keeps me interested. The eyes on the Santa are a type most often seen on Scandinavian Flat Plane figures. Four cuts and pop out a chip. Careful not to pop out the wrong one!
Well, I think I've rambled enough for one day. Until next time, when we get back to the lovespoon (I hope), let the chips fly!
Labels:
carving,
elf,
face,
Santa,
wood,
wood carving,
woodcarving
Monday, May 25, 2009
Territory Days!
Well, Territory Days have come and gone, and, boy, were they wet! It rained every day, but it didn't seem to "dampen" [heh] the enthusiasm of the crowds. They'd find shelter while it was raining, then, when it quit, they were back out on the street.
Territory Days is a street festival sponsored by the Merchant's Association of Old Colorado City, the touristy section of Colorado Springs. It was once it's own entity before Colorado Springs grew enough to gobble it up. Every Memorial Day weekend for the last 34 years they have blocked off the main street for 7 blocks, and set up a double row of vendors tents down the center of the street. There are a couple of stages for musicians, jugglers, and enough food stalls that if you wanted to eat at all of them, you'd have to have 9 meals a day each of the three days!
I was set up outside a store called Handmade Santas & More. This store sells all the Santas I can make. The lady that owns the store, Melanie De Shon, makes very ornate Santa dolls some of which stand 18" tall and sell for $400! My stuff goes for pocket change, comparably.
Someone from the Merchant's Association was going around encouraging people who dressed the part. The guy gave me a lump of peanut butter fudge for having the best "costume" he'd seen all day. Trouble was, I wasn't wearing a costume! That's how I dress when I'm not at work. Oh well, the fudge was good.
Those pictures are to prove that I didn't just sit around looking pretty! I was working! Unfortunately when I work I go into a sort of zen state wherein about the only things that move are my hands. I can do that for hours! Given the fact that I was sitting in a chair that was probably made around the turn of the (20th!) century, that wasn't such a good idea. By the time I finally got up to move around, I was so stiff that I felt as old as I look!
But it was fun. Several of the tourists asked to take my picture. One little boy, looked about two years old, must have been absolutely convinced I was Santa himself, though strangely dressed. He must have stood there for a good five minutes just staring at me while his parents ate funnel cakes.
In addition, I learned a few things. I found that carving away from home base, and in public, opens you up to new ways of doing things. Since I didn't want to have to keep up with my tool box with all the people around, I "only" brought four knives and a strop in a canvas bag along with the wood. The second day I accidentally left my detail knife at home. That forced me to discover that I can do everything with my 2-1/2" Harley that I can do with my 1" Flexcut, just not quite as quickly. At least as far as Santas go. I did have to modify the way I do my faces, but I like the new method better!
It was a terrific weekend, and I plan to do it again several times this summer.
So, have fun, and, until next time, let the chips fly!
Labels:
carving,
festival,
Santa,
Territory Days,
wood,
woodcarving
Saturday, March 21, 2009
Introducing, The World's First . . . .
Introducing the first Lovespoon/Companion Spoon set in the world. As far as I know. I asked the most knowledgeable person I know about it, and he had never heard of such a thing. I've also not seen anything about it in the research I've done, so, until someone can prove me wrong I'm going to lay claim to it!
The Companion Spoons are a matched (more or less) pair of eating spoons to accompany the primary lovespoon. They will be available with the names of each of the loving pair carved or kolrosed into the handle. I'm also thinking about producing some manner of spoon rack in which to house the Companion Spoons. I haven't decided precisely what form that will take yet.
One thing that is blatantly obvious is that the color of the wood for the Companion Spoons don't match the lovespoon. Well, it did before I finished them! The eating spoons and the display spoon require (??) different finishes. The lovespoon was finished with an application of hot neutral shoe polish. This leaves the wood of the spoon very near the original color of the unfinished wood as very little of the shoe polish is absorbed by the grain. Obviously I can't finish the eating spoons with shoe polish. It may not be toxic, but it certainly will contribute a distinctive whang to the taste of anything eaten with the spoon.
I finished the eating spoons by soaking them in food-grade mineral oil. I've been using an eating spoon finished with mineral oil for about a month now, and I'm liking the way it holds up so far. Could I finish the lovespoon with mineral oil? I could. But just because I could, does that mean I should. What do my Gentle Readers (yes, both of you!) think? Oh, ye who are more knowledgeable about wood finishing than I (just about everybody) think about that idea? Leave me a comment about what you think.
Next time I'll go over the evolution of a lovespoon design. Until then, let the chips fly!
Labels:
carving,
love spoons,
lovespoons,
welsh,
wood,
wood carving,
woodcarving
Saturday, February 28, 2009
Lovespoon Angst, Part Two
Welcome back, friends and neighbors! Take a look at the photo of the lovespoon in this post and compare it to the one in the last post. What you see is the result of approximately six hours of carving!
When last we talked, I hadn't yet decided what I was going to do with the birds at the top of the spoon. Originally I had intended to either kolross or chip carve them. At the last minute I decided to throw caution to the winds and carve them in the round. Fine.
I wish I had made that decision earlier. If I thought the flying heart knot was too small . . . . . I had no idea what I was getting into. I first started by cutting shallow ramps in the "neck knot" to delineate which strands pass over and which pass under. Because when I laid out the pattern originally I intended to carve only one side of the birds, I didn't mirror the pattern on the back side of the spoon. No big deal. I can free-hand the pattern on the back as I carve. Rrrriiiight!
So I started at the bottom of the neck knot and started working my way up the edges of the spoon. I worked the bottom loops around to the back and drew and cut freehand where I thought the strands were going. I worked about a quarter of the way up the back. Then I moved around to the front of the spoon and started work on the piercings. I was using the knife you see on the left of the spoon, made by Carl, the Carver/TurnerFromNoWhere. The blade is tiny (14 mm long, 4 mm wide at the handle, 2 mm wide at the tip), sharp as sin and twice as dangerous. A beautiful knife and the perfect tool for working on small knots. In spite of that, I quickly discovered, while trying to relieve the piercings with the knife, that they were so small that I could only do it by drilling. A 1/16th inch drill bit took 99% of the wood out of the piercings leaving me with only squaring up the insides of the holes with the knife, something emminently do-able.
Only one problem. Because I free-handed and carved the bottom strands of the knot on the back of the spoon, before I drilled the holes, two of the holes went directly through the middle of the strands I had already carved. OK, how does that go? Proper Prior Planning . . . . .
No problem! I had, from the beginning, only intended to finish the front of the spoon. What does it matter if the back of the spoon looks like a dog's dinner? The front looks halfway decent, even though I'm still having trouble keeping the thickness of the strands consistent.
BTW, when carving strands this small with those tight turns, cutting against the grain, unless done VERY carefully, tends to break out relatively large sections of wood, making it even more difficult to keep the strands consistent.
This week I only had two breaks (literally). The first was the crest of the bird's head on the right. When undercutting the front of the crest, I wound up levering the knife blade and snapping off the entire crest. Super Glue to the rescue!
The second break was on the left wing of the flying heart, caused by holding the spoon wrong while carving. Same thing I did to break off the right wing. This time I didn't break it off totally. In any case, back to the Super Glue. David Western gave me some excellent advice: Do the delicate parts LAST! One day I'll learn to listen.
I think I've rambled enough for this week. Next week I think I'll talk about Santa. That'll give me enough time to slow down on the lovespoon so I don't fly into a fit of frustration.
As you can see on the right, I've begun Twittering. Don't know how that's going to work out, but if you want to follow me, just click on the link.
Until next time, let the chips fly!
Labels:
carving,
love spoons,
lovespoons,
welsh,
wood,
wood carving,
woodcarving
Sunday, February 22, 2009
Comments and Critiques
I am always pleased to get comments on my work and constructive critiques. Don't be shy. I have a very thick skin!
Bob
Labels:
carving,
critiques,
cwood carving,
mments,
wood,
wood carving,
woodcarving
Lovespoon Angst
Welcome to my new blog. I'm going to be talking about my journey through the world of woodcarving, good and less-than-good. I've been carving most of my almost six decades on this planet although most of it has been in fits and starts. I guess if you put all my carving experience end-to-end you would come up with about 3 years of carving. I started carving consistently and seriously in the latter part of 2008. Since then I have progressed much further than I would have thought.
I'm going to try to publish at least once a week, and I would appreciate it, if you like what you see, if you would "follow" me by clicking on the Followers gadget on the sidebar. If nothing else, it will make me feel better to know that my posts are not disappearing into the Great Bit-Bucket In The Sky without being read.
Now, to business! I'm going to start off this journey by talking about a work-in-progress (WIP). This is my latest attempt at a lovespoon of my own design. If you are not familiar with lovespoons, the best place to learn about them is David Western's site. He is a master of the form and has been of great help to me.
Most carving blogs and websites tell you how to do things after the author has worked out all the details and made his mistakes. He tells you the right way, bypassing the mistake phase. I think that is incomplete information. My blog will expose all the mistakes I make along the way to getting a good end product. Mistakes are learning opportunities, and I want my readers to get as much information as I can give them, so let's start.
This lovespoon is my own design, as I mentioned earlier. I LIKE this design. The problem is that it basically outstripped my current level of skill. It is a complex design, and, thus, there are a lot of things to keep in mind as you carve it. Too many things, as it turns out, for my feeble mind to follow just now. One of the first "uff-da" mistakes I made was in drawing the patterns for the knots in the tails of the fish and the "flying heart". The strands of the knots are supposed to alternate over-and-under, so that you don't have two or more consecutive overs or unders. This was my first effort at drawing knots, and I was too excited and anxious to get started carving that I didn't pay attention. Because I drew the knots wrong, I carved them wrong even after having read David's book, FINE ART OF CARVING LOVESPOONS, and reading his blog which warns of this very thing. So, Caveat Number One: draw your design and check it, line by line, before you start carving it.
Another item about carving knots. Most people cut them out on a scroll saw before carving. I don't. I don't have a scroll saw, nor do I want one. I used a drill, the only power tool I use in my carving, to drill holes in the pierced areas to give me a starting point for my knife. I used a coping saw in some of the piercings, but not many. This leads me to my second mistake regarding knots: making them too small for a knife. The fish tail knot was fine, but the flying heart knot was too small for the knives I had. This was dealing me fits until I got a mini detail knife from my friend Carl, the Carver/TurnerfromNowhere. His tiny blade has made carving that knot immensely easier. Not faster, mind you, just easier and less frustrating. Just like a scroll saw would for those of you who don't mind using power tools. So, Caveat Number Two: make your design appropriate for the tools you have.
A further item about carving knots: as you are carving the strands, pay attention to BOTH sides of the knot. Unless you do this with every cut, it will be difficult or even impossible to keep the size of the strands consistent. I have made several cuts trying to smooth or even up one side of a strand where the other end of the knife blade, the end I wasn't paying attention to, cut too far into the far side of the strand, making it too narrow or cutting a step into the strand. Caveat Number Three: be aware of the entire length of your knife blade. While the base of the blade may be doing exactly what you want it to, the tip could be cutting into something you don't want to cut.
BTW, those shiny sections of wood on the right wing of the flying heart are caused by super glue. While carving another part of the spoon, I broke that wing off. Inherent hazard! I glued it back on with super glue and soaked the area around the break to toughen up the wood. Not twenty minutes after this photo was taken I broke off the same piece AGAIN! Back to the super glue, The Carver's Secret Weapon! Duct tape for carvers!
I'm going to end this for now. Next time I'm going to be talking about the twin birds at the top of the spoon. I haven't totally decided how I'm going to do them. I originally started out thinking I was going to kolross them or chip carve them, but I'm leaning toward doing them in the round. We'll see.
Before I go, I'm going to address a question that I'm sure will come up: If you made so many mistakes in this carving, why are you still working on it instead of tossing it out and starting a new one? I believe that every carving I do has something to teach me. If I don't finish the carving I'll be missing some of that instruction. I've learned a lot doing this carving, making mistakes and figuring out how to correct them as best I can. I've learned these lessons a lot better and a lot faster than I would have just reading how to do it right the first time. So I try to finish every carving I start, for good or ill.
Until next time, let the chips fly!
Labels:
carving,
instruction,
love spoons,
lovespoons,
wood,
wood carving,
woodcarving
Subscribe to:
Posts (Atom)