Saturday, November 19, 2011

Cutting Wood


Well, you can't carve a face like this without cutting wood, so here we go! Be sure to wear your carving glove and thumb protector. I don't want you springing a leak and getting blood all over that lovely piece of wood you have in your hand! That will just ruin a carving.


The first thing you need to do is take the tip of your knife and cut into the wood following the line you drew to outline the face. Cut in at a slight downward angle; it'll be a little easier that way. Don't worry if you wander off line. As you can see, I did.


Next, from just below the first cut make a series of small cuts back toward the first cut. Do this all the way around the face. Or where the face will be.


This leaves you with a small furrow that outlines the place your face will soon appear. This line will sink straight, more or less, down into the wood as we continue to carve to it, deeper and deeper from both sides. Look at old Sleepy at the top of this post. This furrow you just cut is where his forehead disappears into the wood. Since this is his hair line, you don't want it wandering too far north or south from where it is, or your facial proportions will be off. I just want to repeat here that this is neither rocket science nor mathematics, so it doesn't matter if the line moves a little.


Here's where we begin locating and carving the nose. Make a shallow cut straight down into the wood along the nose line. Try to make the cut extend an equal distance on either side of the center line. You won't be able to cut far down into the wood so don't worry about it and don't try to force it. That cut you just made is called a stop cut. It's called that because it stops the next cut you make from going too far.


Now place your knife below the stop cut on the nose line and cut back up to it raising a small chip of wood like you see here. You're going to be making a lot of these cuts, and each time you do, renew the stop cut at the nose line so the chip will fall away.


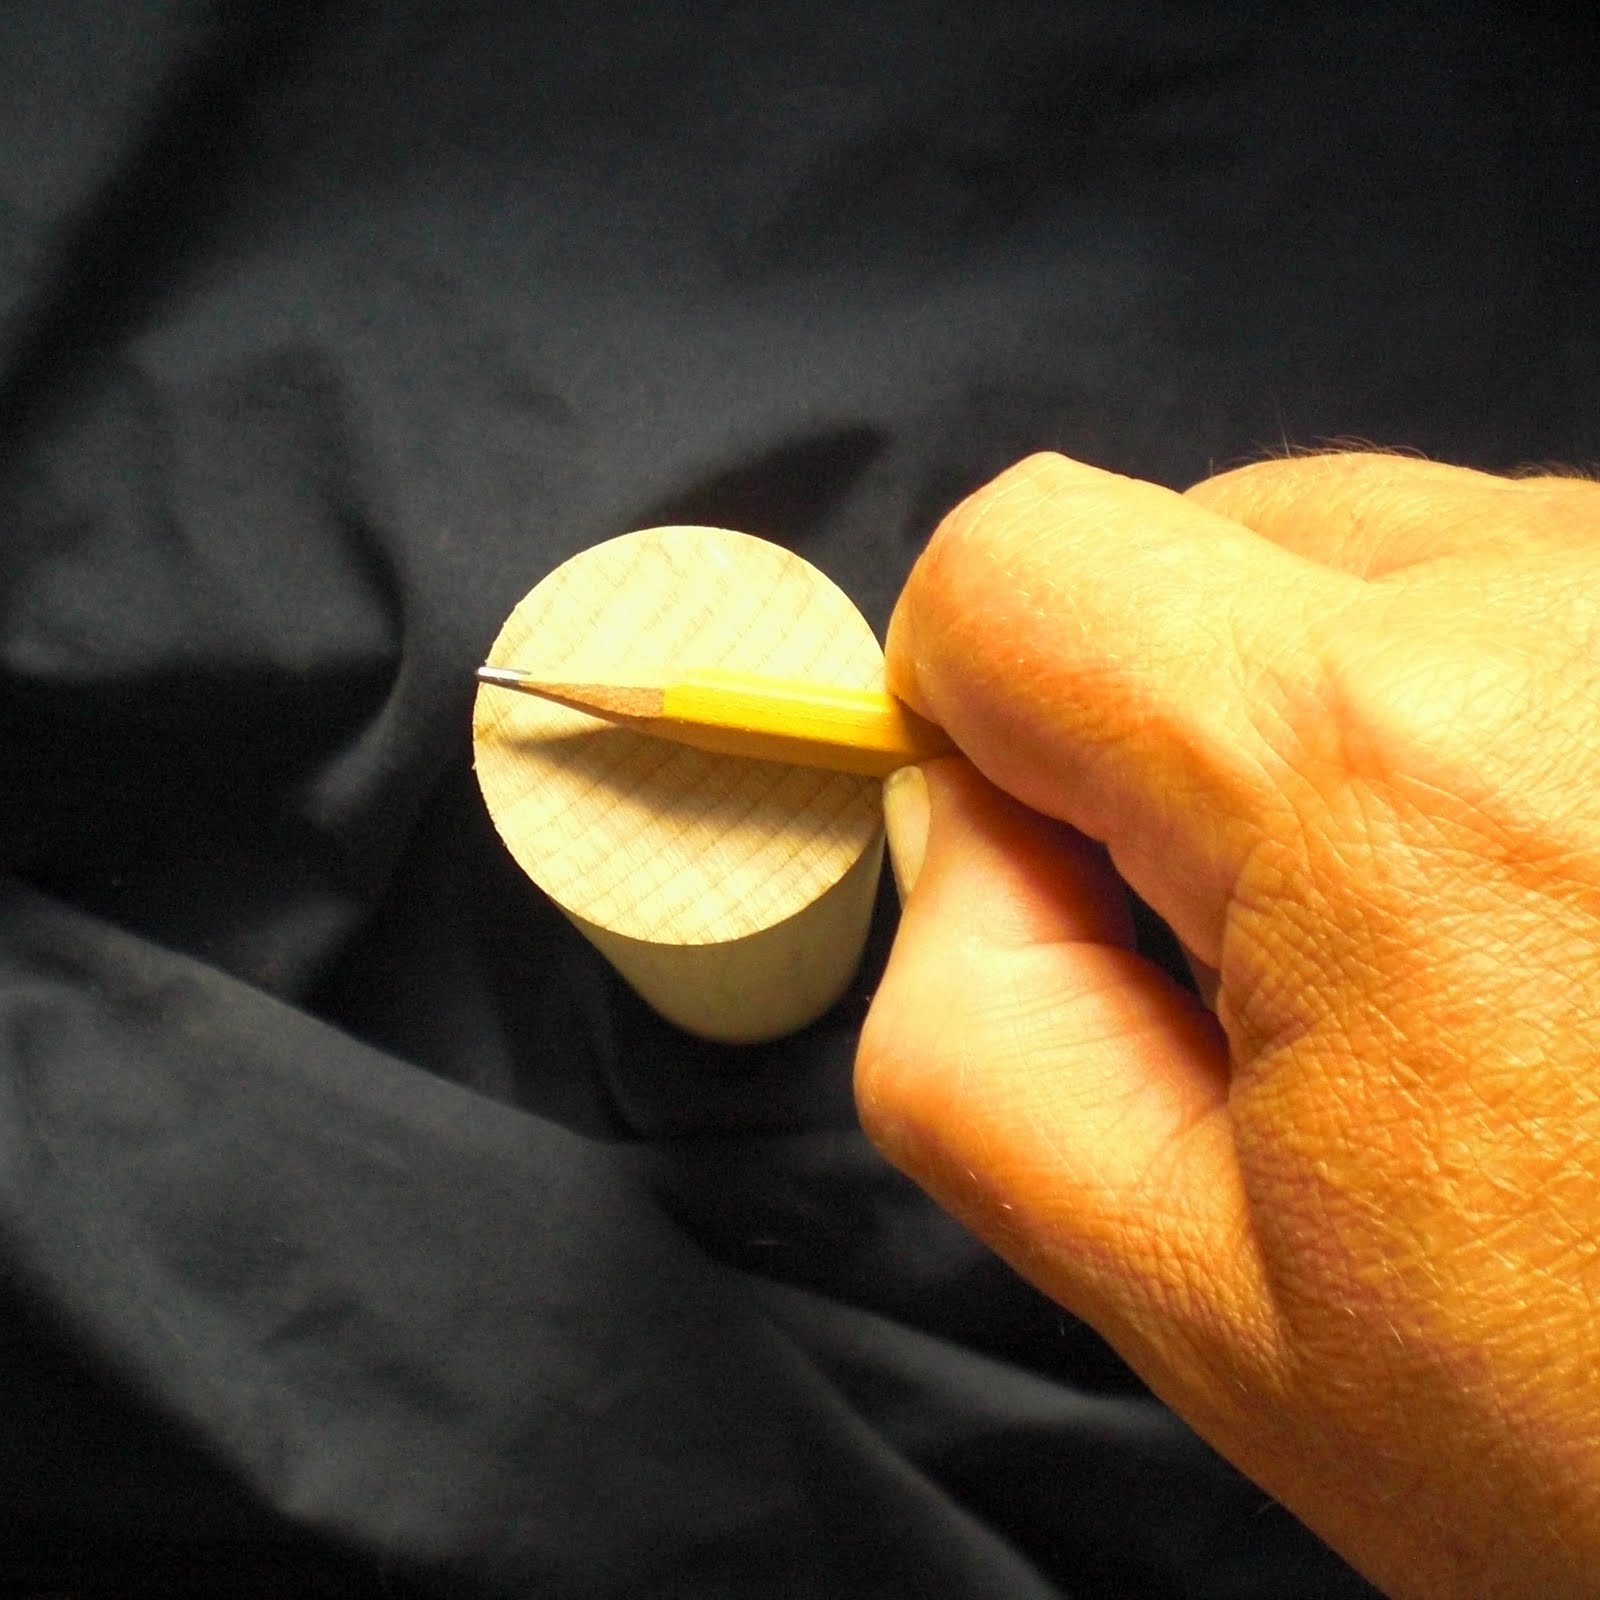
This kind of cut is called a "push cut". You will be using it a lot. As you can see from the photo, you put the thumb of the hand holding the wood on the back of the knife blade and push. This gives you a great deal of control and minimizes the chance that the knife will slip and run away from you. Use just enough force to make the cut and don't try to take too large a chip at any one time. Cutting thin chips may seem like the "slow boat" way to do things, but, believe me, once you get some practice you can remove just as much wood just as quickly and much more safely as you can with a single deep cut. You can also make this cut by putting one thumb on top of the other, but that's a little hard on the bottom thumb.


You can also make the cut this way. Put the thumb of your holding hand on the back of the blade and move your knife hand back toward you. This turns your thumb into a fulcrum and your knife into a lever. You still have great control and much more power than with a straight push cut.


You will continue to make these cuts until you have cut a deep vee up to the nose line as shown in this photo. This will take some time, and you will get tired, so take a break every now and then. You want to make this cut deep, because if you don't your face will be flat. You don't want to carve flat faces! One of my issues about wood spirits is that many of them have flat faces when viewed from the side. I don't like that look, but your mileage may vary.


Old Tangle Foot here doesn't have a flat face, and neither should the wood spirits you carve. I haven't always been so successful as with Tangle Foot, but that was mostly because I was carving in a hard wood and got lazy. One rule to keep in mind: if you think you've finally carved deep enough, carve deeper!

Next time we'll start defining the upper part of the face. Be prepared for some major wood removal!

So, until then, let those chips fly!

Saturday, November 5, 2011

Laying Out The Face


Here we go, people! Getting down to business! As I said earlier, start out with a birch wood dowel 1-1/2" in diameter and about 6" long. You can start with a branch if you want, but I recommend commercial wood to learn on because of its consistency.


The first thing you want to do is draw a center line down the length of the dowel. It doesn't have to be exact. (You'll be hearing that OFTEN!). I put my pinky against the dowel and pulled my hand down the length with the point of the pencil against the wood. This will help you keep both sides of your carving more or less symmetrical. I say "more or less" because absolute symmetry is not only unnecessary, it is unnatural!


Now we are going to start laying out the face. You might notice that I haven't mentioned anything about a "pattern". That's because I think patterns for this type of carving are unnecessary and stifle creativity. If you learn to carve without a pattern, every carving will be different. And that's the way it should be! It's more fun to be surprised when the face emerges from the wood. Draw a short line across the center line roughly an 1-1/2" down from the top. This will be the location of your face's hair line. This will give you room on the bottom for a flowing beard. We are going to be doing a woodspirit with long hair and a flowing beard. I chose this for the very good reason that it will allow you to concentrate on the eyes, cheeks and nose (where most people have issues) without worrying about ears and chin.


Now let's talk about facial proportions. Absolute measurements are NOT important. Close is good enough. Remember the "Rule of Three". Take a look at The Woodbee Carver's site for a good diagram. Also check out his blog. It'll be well worth your time. In addition to what you see there, the width of the face (we are going to use the whole width of the dowel for that) is 2/3 of the distance from the hair line to the chin. So, using the precision caliper that is my hand and pencil I measure the diameter of the dowel.


I transfer that measurement to the front of the dowel by putting my thumb at the hair line mark, then lift my hand until the tip of the pencil contacts the wood, where I make a small mark. I extend that mark a bit so that it is more visible. This gives us the location of the bottom of the nose.


Since the distance from the hair line to the eye line is 1/3 the length of the face, all we have to do is divide the distance we just marked off in two by placing a line ABOUT half way between the two lines we've already drawn. Now we have the location of the eye line.


The distance from the nose line to the chin line is equivalent to the distance from the eye line to the nose line. So, using that precision set of calipers you have on the end of your arm, measure that distance, move your thumb to the nose line, and make a mark on the center line. This gives you the location of the chin. You may ask that if we are going to cover the lower part of the face with a beard, why do we need to know where the chin is. Even though the chin will be covered it will still affect the shape of the beard, so we need to know where it is.


You should now have something that looks like this. You have now located all the major features of the face we are going to carve.


Now I suggest that you take the hair line and extend it in a more or less natural curve out to the sides of the dowel and down to below the nose line. This is the starting point for all the hair that will be on this guy. You should extend the facial lines out past the hair line, because you will be carving these marks away as you work. You'll want to redraw those line several times, so it helps to have them where they won't be carved away.

We'll stop at this point for now. Next time we'll actually put knife to wood!

So, until then, let those chips fly!