Sunday, January 31, 2010

Lovespoons, Colored and Not


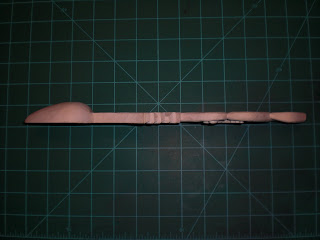
Well, I said I'd do it, and I did it. I painted a lovespoon. Actually, two. The first was the"uff-da" spoon that I painted with multi-colored acrylics just to see what it looked like. The second was the twin of the "uff-da" spoon, without the miscalculation. Looking at the photo above you can see that I painted the sides of the "fountain" the same antique gold that I painted the inside of the bowl. The other spoon I painted with raw sienna to get away from the unrelieved white of bare basswood. Here is a photo from a different angle.


The diamond on the lower spoon was too large. Everything was fine while I was carving it, but when I began to oil the thing, hanging onto the upper part while wiping the bowl with oil, the thing snapped at the diamond cut out. Out came the super glue!

I like both spoons. I think comparing them as to which I like better is a lot like comparing apples and oranges: they are different animals. If you would like to see more on this subject, check out The Woodbee Carver. He put it so much better than I could.

I did do some more work on the spalted maple lovespoon. BTW, pay no attention to that idiot that hijacked my blog last time to say that spalted maple was hard, but not unreasonably so! Maple, even spalted maple, is no wood for the casual carver, unless, of course, they carve with power. In which case it doesn't matter how hard the wood is. If you are doing it with a knife, however, don't expect to take a slice more than a 64th of an inch thick with any regularity.

Actually it isn't unreasonably hard, you just have to change the way you carve, unless maybe you're a rock climber who can lift his entire body weight just by closing his hand. Using a standard paring cut makes my hand cramp within a couple of minutes. To do the piercings I changed from doing a paring cut with a standard sloyd-type knife to using a couple of bent knives. That way I use my forearm muscles instead of my hand muscles.
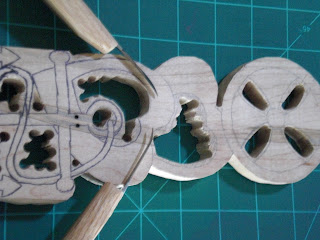
The blades are double-edged, slow curved, one with an inside bevel and one with an outside bevel. They are made by Mike Komick at Preferred Edge. I made the handles myself (still need a little work). The inside bevel blade is great for the straight cuts inside the piercings, and the outside bevel blade makes those inside curves a cinch.

Gotta go get the meatloaf out of the oven. Until next time, let those chips fly!

Sunday, January 24, 2010

A New Spoon And An Old Axe

I have completed the redo of the Art Deco Fountain Spoon without major mishap this time. I haven't finished it yet, dithering about what to do with that lily-white wood. I started coloring the messed-up spoon with colored pencils, but quickly carved that off. My technique needs some (a lot!) of work.

Meanwhile I've started a new spoon using spalted maple.


The design begins with a Maltese cross inscribed in a circle at the top. Below that are two large, pierced hearts, and below that an anchor symbolizing the desire to settle down. The departure from my usual methods and materials are two-fold. This is my first attempt at carving spalted maple. So far, my opinion is, harder than poplar, but not unreasonably hard. This is also the first time I have used nothing but a hatchet (hand axe, whatever) and a knife to rough out a spoon. The only saw cut I made was at the top of the spoon bowl on the back as a stop cut. The hatchet belonged to my paternal grandfather. It's marked Shapleigh Hardware Co. -- Diamond Edge. The claim is not unreasonable.


I not only used the hatchet to rough most of the profile, I used it to thin the handle of the spoon.


 It was actually quicker than sawing, considering what a horrendous sawyer I am.


This is the back of the spoon. Not much worse than if I used a saw and certainly quicker. Maybe one day the old Nordic woodsmen won't laugh and make fun of me.

That's it for today. Gotta go make dinner.

Until next time, let the chips fly!

Thursday, January 7, 2010

That's Some Mighty Purty Kindlin'!

This is the newest effort at a lovespoon. I call it the Art Deco Fountain.


Looks pretty good from this angle. I'm especially fond of the Art Deco "Fountain of Life" with the diamond in it. I originally wasn't so sure about the heart-piercing on the handles of the keys, but having looked at it a while, it's starting to grow on me. On top is the eternal flame.


More on the fountain later.


Since this was carved out of a 1"x3"x12" piece of basswood, I have thought about painting it with a very dilute wash: the fountain with blue and gold along the edges, the hearts as red (of course), the keys with gold, and the flame with a blue fading to a yellow at the top. I don't know though. What do you guys think? It's not traditional, but . . . .


This is my new basswood rough-out knife. It started out life as an Analon kitchen paring knife with a 3.5" blade. Since I almost never use a saw to rough out the shape, I wanted a larger knife with a thin blade so I could remove great gouts of wood quickly. A thin blade in soft wood does that so much better than a typical sloyd-type knife. So I liberated the knife (along with its own sheath) and reground the edge. It works great! On harder woods I'll stay with the sloyd.


This is the knife I used to hollow out the bowl. The blade is by Mike Komick at Preferred Edge, an outside-bevel hook. I carved and mounted the handle. I prefer to think of the handle as a sperm whale even though the flukes are turned the wrong way.


These are the knives I used to relieve the keys into low relief and make the piercings. The piercings were done with the top knife made by my friend Carl Johnson which has a 3/4" tiny blade making tight curves easy. I did the relief with another knife from Preferred Edge, an inside-bevel high curve bent knife. I feel like I have more control doing relief with a bent knife, and Mike Komick makes some of the best out there.

Now that you've seen the good, here comes the bad.


And here's a close up.


I started off not going to carve the back of the spoon. However, while working on the hearts, the knife slipped and took a corner off the back of one of the "leaves" of the fountain. I tried super-gluing a piece of off-cut into the gap and carving it down to match. Unfortunately I didn't like the way it looked, so I decided to carve the back to take off the "uff-da." With a little clean-up, I think it would have worked fine.
Unfortunately . . . .


. . . while doing the other side of the fountain I got in a hurry, got lost, and carved from the wrong direction. I don't think this can be fixed. If anyone has any suggestions, I'd sure be interested in hearing them. In any case, here are some more pictures of the back of the spoon.


I really like the way the heart piercings came out on the back. So I'm going to have to try this pattern again and pay attention this time. I hope. Since I've already screwed this one up, I think I'll do the painting and see how it looks before I try it on a real spoon.

Until next time, let those chips fly!

Friday, January 1, 2010

Happy New Year!

I wish all who visit this site a happy and healthy new year. And health, especially among us carvers, should be near the top of the must do list. Carvers, and especially me, are particularly at risk for tendinitis and carpal tunnel syndrome.

I don't, typically, use a carving glove for a couple of reasons. One is that I started carving before there was such a thing as a carving glove, and did it so long I couldn't get used to using a glove. The other reason is that once upon a time I became determined that I was going to learn to use a carving glove no matter what. So I got a glove and used it exclusively for a couple of months, whereupon I developed tendinitis. Carving gloves, at least the ones I had access to, were slipperier than my bare hand, so I was gripping the pieces I was working on so hard that tendinitis was a sure thing. I wasn't able to carve for almost three months.

Then I ran across the following video. I did the exercises several times a day for two weeks, and I was pain free again. Since that time I continue to do the exercises every couple of weeks or if I find my hands starting to tingle. I have had no more problems. So if you are having problems, or if you want to avoid having problems, give the exercises a try. They can all be done inside a couple of minutes, and they've saved me a lot of pain.


So have a happy and health new year!